
Wednesday, November 24, 2010
Monday, November 22, 2010
Replacement Studs for Studded Tires
Studded tires make a world of difference when the streets are coated in a layer of glare ice. The studs, typically made of tungsten carbide, are small thumbtack-shaped pieces of metal that are held into the tire by their wider base end. It's very common to lose a stud or two from time to time, but they are easy to replace. Unfortunately, only some manufacturers offer replacement studs for sale. Let's see how close of a fit the available studs are to several other manufacturers' studs:
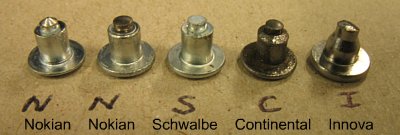
Nokian studs
Probably the most common replacement stud available is the Nokian pointed-tip stud. These studs are found on the Nokian Extreme models, and are only slightly different from the domed-tip studs found on most of the rest of Nokian's tires (the A10, W106, Mount & Ground, etc.) All of the readily-available Nokian studs are the pointed tip variety. There is almost zero difference in the dimensions of these two studs.
Schwalbe's Marathon Winter tires are available in a number of different sizes, and all use the same type of stud. Unfortunately, Schwalbe replacement studs are not normally available. Fortunately, Nokian replacement studs are a perfect fit.
The stud measured here was borrowed from a Continental Spike Claw 240 tire. Continental replacement studs are not normally available, but Nokian replacement studs are a perfect fit.
Innova tires are usually quite a bit less expensive than other studded tires, but beware that Innova uses an inferior material for their studs. Instead of tungsten carbide, Innova's studs are made from plain old mild steel. While they are less expensive to produce, steel is significantly softer than your average pavement surface, and the studs literally wear down over time if ridden on bare pavement. The expected lifespan for these studs can be less than one season in many cases. Innova studs are readily available, but are not a good choice for replacing missing carbide studs from other manufacturers for durability reasons. Despite the slightly different dimensions, these studs should be close enough in size to be interchangeable with all of the other studs measured here.
The bottom line is that all five of these studs should be interchangeable with one another. If you're missing a few studs from your Schwalbe or Continental tires, the readily-available Nokian studs should be a perfect replacement.
The only major stud not available for measurement were those used in Kenda Klondike studded tires. If a Kenda stud comes my way, I'll add it to the list.
Nokian studs
Probably the most common replacement stud available is the Nokian pointed-tip stud. These studs are found on the Nokian Extreme models, and are only slightly different from the domed-tip studs found on most of the rest of Nokian's tires (the A10, W106, Mount & Ground, etc.) All of the readily-available Nokian studs are the pointed tip variety. There is almost zero difference in the dimensions of these two studs.
- Material: carbide
- Tip shape: pointed or slightly domed versions
- Overall height: 5.8mm (pointed), and 5.5mm (domed)
- Base height: 1.0mm
- Base diameter: 6.5mm
- Shaft diameter: 3.4mm
- Tip diameter: 2.0mm
Schwalbe's Marathon Winter tires are available in a number of different sizes, and all use the same type of stud. Unfortunately, Schwalbe replacement studs are not normally available. Fortunately, Nokian replacement studs are a perfect fit.
- Material: carbide
- Tip shape: flat
- Overall height: 5.5mm
- Base height: 1.0mm
- Base diameter: 6.3mm
- Shaft diameter: 3.4mm
- Tip diameter: 2.0mm
The stud measured here was borrowed from a Continental Spike Claw 240 tire. Continental replacement studs are not normally available, but Nokian replacement studs are a perfect fit.
- Material: carbide
- Tip shape: slightly domed
- Overall height: 5.5mm
- Base height: 1.0mm
- Base diameter: 6.4mm
- Shaft diameter: 3.4mm
- Tip diameter: 1.9mm
Innova tires are usually quite a bit less expensive than other studded tires, but beware that Innova uses an inferior material for their studs. Instead of tungsten carbide, Innova's studs are made from plain old mild steel. While they are less expensive to produce, steel is significantly softer than your average pavement surface, and the studs literally wear down over time if ridden on bare pavement. The expected lifespan for these studs can be less than one season in many cases. Innova studs are readily available, but are not a good choice for replacing missing carbide studs from other manufacturers for durability reasons. Despite the slightly different dimensions, these studs should be close enough in size to be interchangeable with all of the other studs measured here.
- Material: mild steel
- Tip shape: irregular, rounded-off tip
- Overall height: 5.4mm
- Base height: 1.1mm
- Base diameter: 6.9mm
- Shaft diameter: 3.8mm
- Tip diameter: 2.5mm
The bottom line is that all five of these studs should be interchangeable with one another. If you're missing a few studs from your Schwalbe or Continental tires, the readily-available Nokian studs should be a perfect replacement.
The only major stud not available for measurement were those used in Kenda Klondike studded tires. If a Kenda stud comes my way, I'll add it to the list.
Sunday, November 21, 2010
Proprietary Stuff to Make You go Faaaaaast
 Image swiped gratuitously from Trek's online catalog. 'Tis a fast-looking beast, is it not?
 Ready to rumble. We've got a bunch of them: come check them out!
Recently I spent a few days setting up our fleet of Trek Speed Concept time trial and triathlon bikes. This was my first time handling some of this technology and I was highly impressed with much of the execution. They really are amazing pieces of machinery: the engineers over at Trek eschewed off-the-shelf componentry in favor of an integrated approach for brakes, internal cable routing, headset, etc. The result is a bunch of proprietary stuff that requires some re-learning and exploration.
You know, the kind of stuff that gives bike nerds the happy.
 The rather inefficient seatpost clamping device. Proper torque is very important because there's only a small aluminum cam holding your seat at the correct height. Carbon assembly paste works wonders here.
One thing is for sure, no matter how far-out the design happens to be, it is going to work within the parameters of a few rudimentary mechanical principles. Maybe there are no bearings in the headset: the blasted thing still has to rotate, right? And it still takes some sort of preload, right? One can hope so. A cable goes into the brake, pulls on something, and the pads contact the rim: got it. So what if everything is hidden mysteriously inside a sinister-looking plastic shroud and the cable disappears into the down tube? It's just a brake. [Incidentally, it's very much like Charlie Cunningham's Roller Cam brake from 1986] So we can make it work, and if the manufacturer's info is good, we can make it work perfectly. And if it doesn't work perfectly, we can get the parts to make it work perfectly.
 Quick headset adjusts just got a whole lot slower.
 The headset sort of lives under that top cap. Sort of.
 The rear brake is bringing back the Darth Vader look for 2011.
 Here's the rear brake as the wind sees it.
 The mechanic has to wave his fingers around near the razor-sharp teeth on that chainring when making quick brake pad adjustments.
Here's where things can get tricky: If Trek stops making the parts, what then?
Some fly-by-night companies release cutting-edge stuff, only to discover that cyclists break things and want them fixed, sometimes for free. More than one upstart business has been killed by warranty issues, often caused by skimping on R&D and real-world testing in favor of releasing the product quickly. Then stuff starts to break, or doesn't work right, or gets a bad reputation on internet forums (probably the last place you should go in search of wisdom and insight), or whatever, and the company folds up. Usually they retreat into the shadows and regroup, focusing on things like dentrifices, banjos, Arabesques, ice floes, briskets, arthropods, obelisks, flautas, decorative gourds, and sippy-cups. We wish them the best, of course, but we also wish that they would support their bicycle-related products with spare parts.
I'm going to go out on a limb and say that Trek won't do anything like that to anyone, but they have had their share of mercifully short-lived ideas. New technology is like that: sometimes it works in the real world, sometimes it doesn't.
Overall, most of the ideas on the Speed Concept bike make good sense. The rear brake is a robust unit, made out of real metal, and crazy easy to set up once you get through the force field of tiny bolts and plastic. The cable routing for the shifters and brakes only allows for about 90 degrees total (45 per side) of steering rotation, but I doubt too many people are going to bust out a trackstand at a stoplight on a Speed Concept.
I noticed right away that Trek called it "Speed Concept" rather than "Race-Day Mechanic's Dream Concept." These things are designed to go faaaaaast. Cables flapping in the wind, round handlebars, brakes out where you can adjust them--that stuff's not faaaaaast, it's pedestrian. The Speed Concept bikes are designed for a world where a tenth of a second is a long time, and the concessions they make in convenience are purposeful.
 This is the "Lunchbox." It is not UCI legal (as Kevin discovered at the Tour of California), so if you want to bring a sandwich or some Fig Newtons during the prologue at the Giro this year, you'll have to tuck them in the front of your skinsuit.
Still, I'm glad I'm not a team mechanic having to fight against the clock with the infernal (oops! I mean internal) cable routing or last-second rear brake adjustments, but usually the pro teams bring a bunch of "just in case" bikes to any given event. For the regular human beings who will be buying these, make sure your brakes are set up the day before, and be careful not to kink a cable right before your event!
Monday, November 15, 2010
Winterizing a Snow Bike
Fall is the best time of year to give your bike a overhaul for a couple reasons.
If you are putting a bike away for winter storage you'll want to get the water out of the internals where it can cause rust throughout the winter. The other benefit is that your bike will be ready to ride when spring arrives. Plus you'll save money because most shops run an overhaul sale in the winter.
If you are riding your bike all winter then you'll want to get a low temp grease in the bearings and free-hub body, maybe install studded tires, and rust proof steel frames.
This poor Pugsley has been ridden and raced hard yet received very little maintenance. We gave it a Winter Overhaul about a month ago to make sure that it was ready for the first snow fall of the year.

Rust was starting to eat away at the fork...

...and frame...

...so I applied JP Weigle Frame Saver

Next the drive-train got cleaned up in our
environmentally friendly parts washer.

I applied anti-seize to the bottom bracket shell threads
to prevent galvanic corrosion.

Then I faced the head-tube.

Now it looks like this.

The brake posts got plenty of grease.

The derailleur pulleys were removed, cleaned and
lubricated.

This Pugsley has rear hubs in both wheels. Both got
repacked with Morningstar 'Lectric Lube

And of course the free-hub body was purged and filled
with 'Lectric Lube.

'Lectric Lube grease remains the same consistency down
to -50f so you don't get any drag when riding in really
cold temps.

Freewheel Bike's Winter Overhaul Special includes everything from our regular overhaul then the price is reduced by $80 plus it includes free pick up and delivery.
Friday, November 12, 2010
Counterpoint: Rock Shox XX Review
Earlier this summer we had the privilege of sitting in on some Rock Shox suspension training with a few fellows from Marzocchi. No--Rock Shox. Yes, that's it. Anyways, I had endured a few bad experiences with Rock Shox suspension back in the day (a leaky, fragile first-generation SID) and had pretty much written them off as a bunch of snake-oil selling Hessians (no offense to any Hessians in the wide scope of Golden Wrench readership). My junk-o-meter was set to stun when they began to tear apart the demo fork for our learning. I scrutinized every piece they passed around, expecting a bunch of spindly ribbons of tortured aluminum, doohickeys, religious totems, ventricles, and Clif bar wrappers to come out of the damping side. Nope, just a couple of assemblies! I was surprised by the simplicity of their damping system, and especially by their platform: it's a plastic spring that controls a blowoff port. Everything in these forks is modular: they are a breeze to work on.
What really intrigued me was the X-Loc feature found on the XX forks. We had done a piece for the MORC newsletter on how to bleed and set up the X-Loc, and it's a pretty thoughtful design. No cable drag or huge spring tension to overcome cable drag: just liquid-smooth hydraulic goodness. On, off, adjustable floodgate. The simple-minded can call it witchcraft: I think Bernoulli and Newton would be proud of its simplicity and effectiveness. Furthermore, I can't wait for a rear-shock counterpart, or one hydraulic switch that will control both front and rear! Or an electronic damping system that responds to my feelings as long as I don't ride too close to a microwave tower or drain the battery! Oh wait--K2 already did that back in the day.
Anyways, I sent off for a Rock Shox SID XX with an aluminum crown. About 8 hours later, it arrived from QBP, complete with the fork itself, an enormous cardboard box decorated in a fetching shade of blue, several layers of plastic bags, a shock pump, ONLY ONE BLASTED STICKER AND NOT THE SWEET DECAL KIT (!??!?!!??!?!?!!!??!?!), and a manual. Also included was a travel reducer to shorten the stroke down to 80mm, which will probably never see the light of day after it was deposited in my junk drawer. Initial impressions were positive: it's a modern and attractive white color with gray graphics; it's smooth (better be, right?); it's not horribly heavy; and that lockout is the cat's pajamas.
After a few weeks spent scaring up the funds to actually pay the thing off, I still was able to ride the fork for at least four weeks before some other guy at the shop had heard anything besides "Stop calling us, man, or it will take longer, man" from a certain company out west. That company will remain anonymous, but the clever among us will recognize that it is named after a scavenging mammal that gains its sustenance by raiding the nests of game fowl.
I slapped the fork onto my trusty old Gunnar Ruffian (having crashed and bent the previous fork at the Murphy TT), filled it full of air, mounted the lockout on the left side, and tried it out. The front wheel was doing things I was not accustomed to, such as tracking straight through rough terrain and holding a line in rough corners. I would lock the fork out on the road and when climbing out of the saddle, but then I would forget to unlock it. That's OK, because in addition to about 3/4" of super-progressive travel (even with it locked out) you can adjust the "gate" feature and make the blowoff ports open sooner. After a couple of forgetful episodes, I dialed down the gate so the fork would open up sooner, sparing my pore ole wrists. It's a platform, yay!
After some test riding (which included the Border Battle race, as good a test ride as one will find), I moved the lockout to the right side, under the bar. Single speed, no shifters, plenty of room. Since the lockout button was in the place that a RapidFire shifter would be, I referred to it as my "climbing gear." Soon I was hitting the lockout every time I got out of the saddle at all, and my "climbing gear" became a "road gear," a "sprint gear," a "trackstand gear," and a "flat, smooth trail gear." That lockout gets a workout and hasn't leaked, slipped, cried, gurgled, cheated on its taxes, pestered my dog, or written any bad poetry since I bought it. Not yet anyways.
Nowadays, the Gunnar is doing cyclocross duty and the Rock Shox XX is on my old Trek Fuel, AKA "Mister Sloppy." Changed that bike around, I tell you what! It came with a Pure DeLite SID that was flexy and noisy and gross, but with the XX old Mister Sloppy rides like a KX 125. It took a few rides to get used to the handling, going from 80mm to 100mm of travel, but after flipping the stem and messing with spacers, Mister Sloppy descends with some confidence.
Objection: Yes, and OK, you mister guy, but wouldn't it be better to ride a platform fork that locks out for you?
Answer: Sometimes I'd rather not have to wonder if my fork is locked out, such as when I'm going to bunnyhop over a log. Or, if I'm in competition and sprinting on rough ground, I want the front to feel rigid, even at the potential expense of some shock absorption. As for the lockout learning curve, I hit it without even really thinking about it: If the trail is smooth, I lock it out. If not, I unlock it. So convenient! Sometimes I even hit the lockout in the air for a cushy landing when I jump over things!
Objection: Yes, and OK, mister guy, but haven't you had to mess with it a bunch since you bought it?
Answer: Not really. As far as setup is concerned, the factory recommendations have been fine for me. I initially ran the air pressure on the high side of things, but now that I use the lockout so much, I'm running it softer. I've had to add air to the positive spring one time since August. I've never touched the damping dial: it's about 1/4 of the way from full rabbit.
If you're in the market for a new fork, definitely give the Rock Shox line a look. They're not winning the OEM game these days (russet-colored scavengers), but they still produce some fine performers for Minnesota-type riding.
Wednesday, November 3, 2010
What do you mean my chain "stretched"?
Bicycle mechanics often refer to a worn out chain as "stretched". It sounds a little weird to think of a metal chain stretching so I don't blame you if you're a bit skeptical of this statement. When we say a chain is stretched out we aren't saying that it is like a rubber band that has been stretched out too long and won't return to it's original shape. It would be more accurate to say the chain is elongated. What is happening is that the distance from pin to pin has increased.


Worn teeth can lead to things like chain suck, slipping under load and poor shifting. A worn chain is also more prone to break. If you replace your chain before it is worn out you can almost always avoid these problems and actually save money.
Be the first to correctly answer the following trivia question and win the Park Tool CC-3. E-mail answers to peteh@freewheelbike.com.
If using a ruler to measure chain wear, how much can a chain stretch (in inches) before it is considered worn out?
Edit: We have a winner. The answer is 1/16". Thanks for playing.
Here are a few links if learn more about measuring chain wear with a ruler;
http://bicycletutor.com/chain-wear/
http://pardo.net/bike/pic/fail-004/000.html
http://www.epicidiot.com/sports/chain_length_calculator.htm#stretch
http://en.wikipedia.org/wiki/Bicycle_chain
Here is a picture of a chain wear indicator on a new chain. Note that it reads 0.04mm. That would be a happy chain.

Here is a stretched or elongated chain. The tool reads 1.73mm. That would be a sad chain.

As you can see from this picture there are two grooves in the chain pin that correspond to the inner plates of this chain.

That wear occurs only on the side of the pin that experiences load.

The grooves can get quite deep.

A worn chain will wear out the teeth on the cassette and chain-ring(s).

Worn teeth can lead to things like chain suck, slipping under load and poor shifting. A worn chain is also more prone to break. If you replace your chain before it is worn out you can almost always avoid these problems and actually save money.
Be the first to correctly answer the following trivia question and win the Park Tool CC-3. E-mail answers to peteh@freewheelbike.com.
If using a ruler to measure chain wear, how much can a chain stretch (in inches) before it is considered worn out?
Edit: We have a winner. The answer is 1/16". Thanks for playing.
Here are a few links if learn more about measuring chain wear with a ruler;
http://bicycletutor.com/chain-wear/
http://pardo.net/bike/pic/fail-004/000.html
http://www.epicidiot.com/sports/chain_length_calculator.htm#stretch
http://en.wikipedia.org/wiki/Bicycle_chain
Subscribe to:
Posts (Atom)